Distance measuring ultrasonic HC-SR04 in MultiWii

While I am waiting for my new toys from China, I’m researching other things.

Currently on the official forum are beginning to look at something on using ultrasound sonar altitude control, when it is very close to the ground.
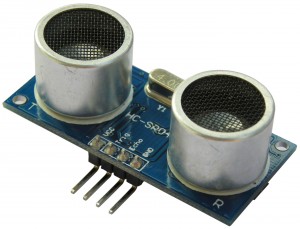
This sonar is capable of measuring a distance between 2 and 450 cm. The problem is that the code you usually find on it is not very efficient because it is based (oversimplifying) to send a signal ultrasound and wait for the signal to bounce off the object you have in front (if any) and return. And knowing what it took and knowing the speed of sound then calculate the distance..

The problem is this does not applies to MultiWii because the processor can not be waiting this time, which is a lot for what we need.

After a couple of hours I’ve gotten it to work based in interruptions, so that now sends the ultrasonic sound and continue execution. When the response is received an interrupt is trigger and the distance is calculated. It is much more efficient.

So far the first step, now we have to integrate it into the MultiWii code, that I have a little big and I have to cram fine. The idea is that when you are close to the ground distance use the sonar distance , and when you’re away use what the barometer says.

The code and test ready to paste in Arduino is:

// setup pins and variables
#define HC_SR04_echoPin 3 //  (digital 3)
#define HC_SR04_trigPin 7 //  (digital 7)

volatile unsigned long Sonar_starTime = 0;
volatile unsigned long Sonar_endTime = 0;

void Sonar_changeDetected()
{
  if (digitalRead(HC_SR04_echoPin) == HIGH) {
    Sonar_starTime = micros(); // Apunto el tiempo de inicio
  }
  else {
    Sonar_endTime = micros();
  }
}

void Sonar_init()
{
  // Sonar init
   pinMode(HC_SR04_trigPin, OUTPUT);
   pinMode(HC_SR04_echoPin, INPUT);        // Set echo pin as input

   attachInterrupt(1, Sonar_changeDetected, CHANGE);
}

void Sonar_update()
{
  digitalWrite(HC_SR04_trigPin, LOW);      // Send 2ms LOW pulse to ensure we get a nice clean pulse
  delayMicroseconds(2);
  digitalWrite(HC_SR04_trigPin, HIGH); // send 10 microsecond pulse
  delayMicroseconds(10); // wait 10 microseconds before turning off
  digitalWrite(HC_SR04_trigPin, LOW); // stop sending the pulse

  Sonar_starTime = micros(); // Apunto el tiempo de inicio
}

unsigned long Sonar_read()
{
  return (Sonar_endTime - Sonar_starTime) / 58;
}

// Test
void setup()
{
  Serial.begin(9600);
  Sonar_init();
}

void loop()
{
  Serial.print(Sonar_read(), DEC);
  Serial.println(" cm");

  Sonar_update();

  delay(100);
}

Updated with a new and improved method

With the above method were limited to using «attachInterrupt» to pins 2 and 3, which are the only ones who managed that instruction.

With this new version we can use any two digital pins available to us.

#define HCSR04_EchoPin         8
#define HCSR04_TriggerPin      12

static int32_t  SonarAlt;

volatile unsigned long HCSR04_starTime = 0;
volatile unsigned long HCSR04_echoTime = 0;
volatile unsigned int HCSR04_waiting_echo = 0;
unsigned int HCSR04_current_loops = 0;

// The cycle time is between 3000 and 6000 microseconds
// The recommend cycle period for sonar request should be no less than 50ms -> 50000 microseconds
// A reading every 18 loops (50000 / 3000 aprox)
unsigned int HCSR04_loops = 18;

void Sonar_init()
{
  // Sonar init

  // this is ATMEGA168 specific, see page 70 of datasheet

  // Pin change interrupt control register - enables interrupt vectors
  // Bit 2 = enable PC vector 2 (PCINT23..16)
  // Bit 1 = enable PC vector 1 (PCINT14..8)
  // Bit 0 = enable PC vector 0 (PCINT7..0)
  PCICR  |= (1<= HCSR04_loops)
  {
    // Send 2ms LOW pulse to ensure we get a nice clean pulse
    digitalWrite(HCSR04_TriggerPin, LOW);      
    delayMicroseconds(2);

    // send 10 microsecond pulse
    digitalWrite(HCSR04_TriggerPin, HIGH); 
    // wait 10 microseconds before turning off
    delayMicroseconds(10);
    // stop sending the pulse
    digitalWrite(HCSR04_TriggerPin, LOW);

    HCSR04_waiting_echo = 1;
    HCSR04_current_loops = 0;
  }
}

// Test
void setup()
{
  Serial.begin(9600);
  Sonar_init();
}

void loop()
{
  Serial.print(SonarAlt, DEC);
  Serial.println(" cm");

  Sonar_update();

  delay(10);
}

SugarSync, una versión mejorada de DropBox

Buscando un lugar donde guardar un backup de mis fotos y otros datos importantes me planteé DropBox.

Cómo era de esperar la versión gratuita se me quedaba muy corta y la versión de pago me parecía muy cara. Por ello me puse a buscar alternativas y tras probar varias me he quedado con SugarSync.

Es similar a DropBox pero con algunas ventajas. Para empezar, en vez de tener sincronizada una única carpeta (aunque tenga varias dentro) se pueden añadir todas las carpetas que queramos, aunque estén en rutas distintas de nuestro PC. Esto es una gran ventaja ya que nos deja total libertad para organizar nuestra cosas en el disco duro.

Además el software que se instala es mucho más avanzado que DropBox, permitiendo asociar una carpeta A de un ordenador con una carpeta B de otro u otros ordenadores. Estas carpetas se mantendrán sincronizadas sin importar el nombre o la ubicación de cada una.

Por si fuera hay software para Windows, MAC, Android, Symbian, Windows Mobile, Blackberry, iPhone, iPad….

Tienen una versión gratuita de 5 GB, y ampliar a 30 GB son menos de 5$ al mes, que es lo que de momento he contratado. Si alguno está interesado en probarlo os agradecería que accedieseis a través del siguiente link, que así yo recibo un poco de almacenamiento extra.

SugarSync

SugarSync, an improved version of DropBox

Looking for a place to store a backup of my photos and other important data I decided to try DropBox.

But as it was expected, the free version is very short and the paid version seemed very expensive. That is why I looked for alternatives and after trying several I have choosen SugarSync.

It is similar to DropBox, but with some advantages. First of all, instead of having synchronized a single folder (though you have several inside) you can add all the folders that we want, even if they are on different routes in your PC. This is a great advantage because that gives us total freedom to organize our things on your hard disk.

The software that is installed is also much more advanced than DropBox, allowing to associate one folder «A» with one folder «B» from other computer or other computers. These folders remain synchronized regardless of the name or the location of each one.

Also, there is software for Windows, MAC, Android, Symbian, Windows Mobile, Blackberry, iPhone, iPad…

They have a free version of 5 GB, and 30 GB for less than $ 5 a month, which is what I have hired. If anyone is interested in trying I will appreciate it you do it through the following link, so I will get a little storage extra.

SugarSync

Error adding user control window in WPF

Today I found a mistake that made me lose almost an hour until I realized that was happening.

I am developing a project in WPF. In this project I have a main window and then I’ve created me a folder with multiple user controls. The problem has come when I’ve put in the window design mode and and tried to drag her user controls that had created.

To drag them up didn’t let me drop them, it is as if the window was blocked. However the own controls WPF if that allowed me to place them. If I added them manually in the XAML then the designer gave me an error, in particular this:

Unable to load the metadata for assembly 'MY_ASSEMBLY'. This assembly may been downloaded from the web.

But the strange thing is that if you ran the application it worked perfectly.

After testing thousands of things I’ve noticed the problem that was the project on which he was working on a network drive, and not on a local disk.

It had opened the project from the network drive and everything works correctly, in fact at home I usually work like this because I have all the projects on a server and access across different computers via shared drives. I never had problems until today. I have copied the project to a local disk and everything has been solved.